Manage Conversions
Track visitor journeys from first interaction to completed conversion. Conversion Paths define the sequence of pages visitors follow, while Conversion Zones identify the specific elements they interact with at each step.
Quick start
Create a conversion path with tracking zones in five minutes:
1. Click Create New Path and enter a name (e.g., "Newsletter Signup")
2. Select a conversion type and choose the domain
3. Add steps by selecting pages from the dropdown, then drag to reorder
4. Choose a value source: Zero Value for goals, Fixed Value for revenue tracking
5. Save the path, then click Configure Zone on each step to select the tracking element
Paths begin tracking once all steps have zones configured and the path status is Active.
Understanding the display
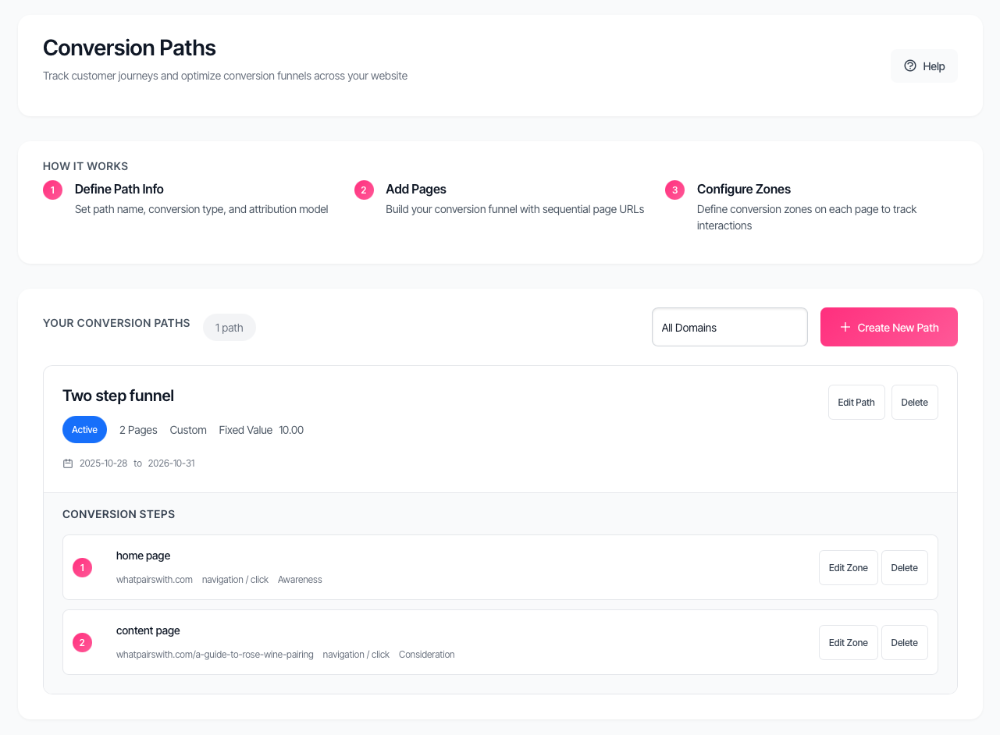
Conversion paths dashboard
The main dashboard displays all configured paths as cards. Each card shows:
• Path name and status badge (Active or Inactive)
• Conversion type (Lead Generation, Purchase, Signup, etc.)
• Number of pages in the path
• Value source (Zero Value or Fixed Value)
• Active date range
Expanding a path card reveals its steps. Each step shows the page name, URL, zone configuration status, and funnel stage. Steps without configured zones display a warning.
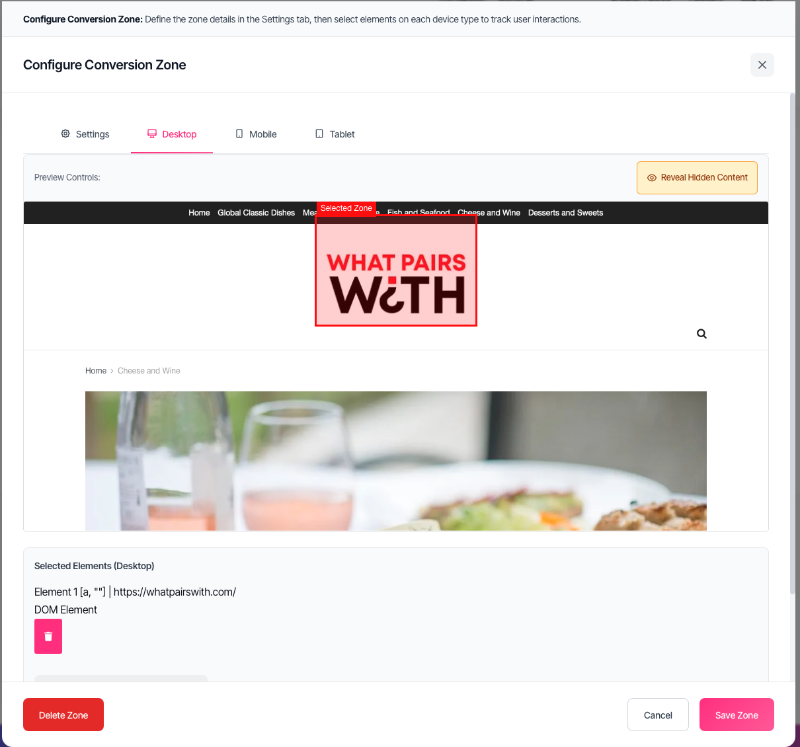
Zone configuration modal
Clicking Configure Zone opens a tabbed modal with four sections:
• Desktop — Preview and select elements at full width
• Mobile — Preview at 375px width for mobile layouts
• Tablet — Preview at 768px width for tablet layouts
• Settings — Zone name, category, and classification fields
The preview area shows either interactive HTML (supporting direct clicks) or static screenshots (requiring drawn selections), depending on how the page was captured.
What should I do next?
| Scenario | Action |
| No paths exist | Click Create New Path and define the conversion journey |
| Path created but steps show warning | Click Configure Zone on each step to define tracking elements |
| Path needs modification | Click Edit Path to add, remove, or reorder steps |
| Path no longer needed | Click Delete to remove the path permanently |
| Too many paths displayed | Use the domain filter above the list |
| Seasonal campaign ended | Set path status to Inactive or adjust date range |
| Cannot select zone element | Use Reveal Hidden Content for modals, or enter CSS selector manually |
| Element differs on mobile | Configure each device tab separately—zones are device-specific |
| Zone selection looks wrong | Delete the selection and retry, or use manual CSS selector |
Conversion paths
Conversion paths define the sequence of pages visitors navigate before completing a conversion. Each path tracks a specific journey—from landing page to thank-you page, product view to checkout, or any multi-step process.

Creating a path
Basic information
| Field | Description |
| Path Name | Descriptive name for the path (e.g., "Product Purchase Flow") |
| Primary Conversion Type | Goal category: Lead Generation, Purchase, Signup, Download, Subscription, Contact, or Custom |
| Domain | Website where this path applies |
| Target Conversion | Optional target number to track progress |
| Description | Optional notes about purpose or context |
Adding steps
Steps define the sequential pages visitors pass through:
6. Enter a Step Name (e.g., "Product Page")
7. Select the page URL from the dropdown
8. Click Add Step
9. Drag steps to reorder the sequence
Pages must be tracked in SERP360 before appearing in the dropdown. Add pages through the Webpages section if required URLs are missing.
Value source
| Option | Use for |
| Zero Value | Goals without monetary value—newsletter signups, content downloads, engagement tracking |
| Fixed Value | Revenue tracking—assign a currency (USD, EUR, GBP) and amount per conversion |
Status and scheduling
| Field | Behaviour |
| Path Status | Active paths track conversions; Inactive paths are paused |
| Active From | Tracking start date (defaults to today) |
| Active To | Tracking end date (defaults to 12 months from today) |
Paths only track during the active date range when status is Active.
Editing and managing paths
• Edit Path — Opens the configuration drawer. Modify fields, add or remove steps, drag to reorder.
• Delete — Permanently removes the path and zone configurations. Cannot be undone.
• Domain Filter — Show paths for a specific domain or all domains.
Conversion zones
Conversion zones define the specific page elements visitors interact with—buttons, forms, links, and other clickable areas. Each step in a path requires a zone to identify what triggers tracking.
Selecting zone elements
SERP360 provides three selection methods:
Method 1: Direct element selection
For interactive HTML previews:
10. Click Select Element below the preview
11. The preview border turns orange (selection mode active)
12. Hover over elements to see a yellow highlight with details
13. Click the target element
14. A red overlay confirms the selection
Selections store as percentages of page dimensions, adapting to minor layout changes.
Method 2: Screenshot selection
For static screenshot previews:
15. Click Select Element
16. Click and hold at one corner of the target
17. Drag to the opposite corner
18. Release to confirm
Draw the box as accurately as possible around the target element.
Method 3: Manual CSS selector
For JavaScript-created elements or precision targeting:
19. Expand the manual selector panel below the preview
20. Enter a valid CSS selector (e.g., #signup-modal .submit-btn)
21. Click Apply to validate
22. Use Save Anyway for elements that exist only after JavaScript triggers them
Finding a CSS selector: Right-click the element on your live site → Inspect → Right-click the highlighted code → Copy selector.
Revealing hidden content
Many pages contain hidden modals, dropdown menus, accordion panels, and tab content. The Reveal Hidden Content feature forces these to display:
23. Click Reveal Hidden Content in the preview toolbar
24. Hidden elements appear with an orange dashed outline
25. Select using normal methods
26. Click Hide Revealed Content to restore normal view
This feature shows CSS-hidden elements. For JavaScript-generated content that does not exist until triggered, use the manual CSS selector with Save Anyway.
Zone settings
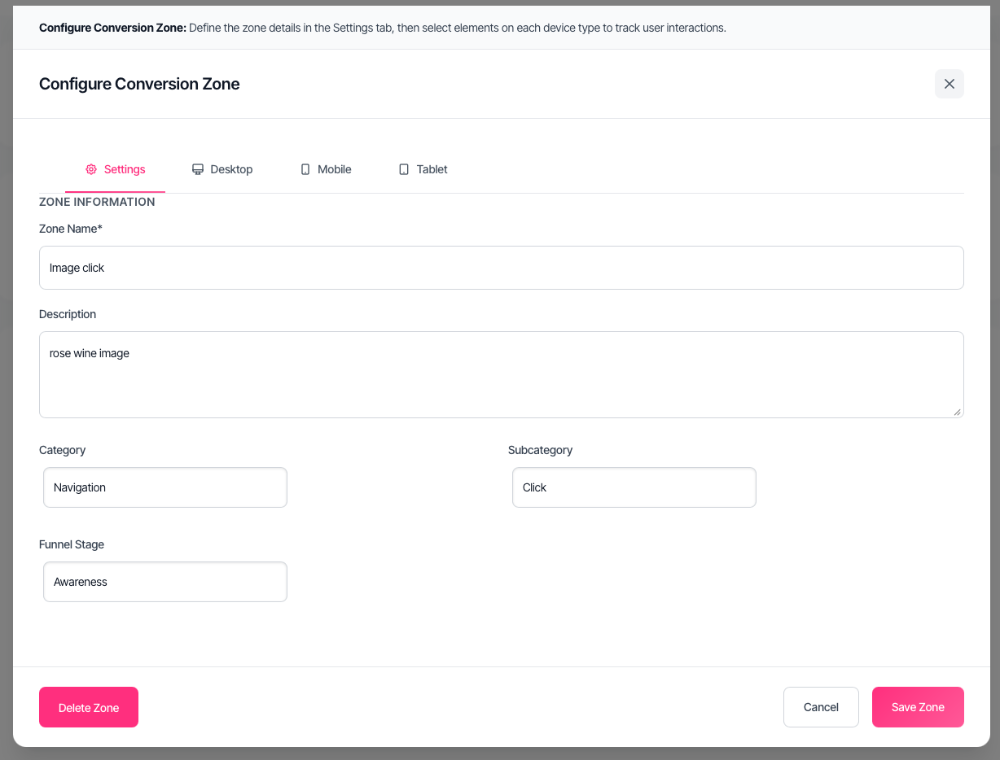
| Field | Purpose |
| Zone Name | Required. Descriptive name (e.g., "Main CTA Button", "Newsletter Form") |
| Description | Optional notes for team context |
| Category | Primary classification: Form, Navigation, Content, Commerce, Account, Social, Search, Support, Media, or Custom |
| Subcategory | Specific type within category (changes based on category selection) |
| Funnel Stage | Position in funnel: Awareness, Interest, Consideration, Intent, Evaluation, or Purchase |
Device-specific zones
Zones are configured independently per device. A button in the header on desktop might move to a hamburger menu on mobile—each requires separate configuration.
Configure Desktop first (typically the most straightforward), then check Mobile and Tablet tabs for responsive variations. If an element uses the same CSS selector across devices, the manual selector approach provides consistency.
Editing zones
• Edit — Click Configure Zone on a step with an existing zone. Make changes and click Save Zone.
• Delete selection — Click the trash icon in the selected elements panel. Removes that device's selection only.
• Delete zone — Click Delete in the modal header. Removes all device selections and settings.
Troubleshooting
Path issues
No pages available in the dropdown
The selected domain has no tracked webpages. Add pages through the Webpages section first.
Save button not responding
Ensure all required fields are completed: Path Name, Conversion Type, Domain, at least one step, and Value Source.
Path not appearing in list
Check the domain filter—it may be filtering to a different domain. Select "All Domains" to see everything.
Path not tracking conversions
Verify: path status is Active, current date falls within the active range, and all steps have zones configured.
Zone issues
Preview shows blank or loading indefinitely
The webpage HTML may not be captured. Check that the page is crawled in the Webpages section. Pages behind authentication may need screenshots.
Cannot select the intended element
Elements may be nested in containers—try clicking different parts. Use manual CSS selector for precision. For hidden elements, click Reveal Hidden Content first.
Reveal Hidden Content does not show the modal
JavaScript-generated modals that do not exist until triggered cannot be revealed. Use manual CSS selector with Save Anyway.
Mobile selection does not match desktop
Responsive designs move elements. Each device requires independent configuration. If the CSS selector is consistent, use manual selector for all devices.
Element selection disappears after saving
Ensure Zone Name is completed (required) and at least one device has a selection.
FAQ
Paths
What is the difference between Zero Value and Fixed Value?
Zero Value tracks conversions as goals without monetary value. Fixed Value assigns a currency amount to each conversion, enabling revenue tracking.
Can steps be reordered after creation?
Yes. Edit the path and drag steps to change order. Historical data is unaffected.
What happens if a visitor skips a step?
Visitors typically need to interact with zone elements in sequence. Skipped steps may prevent conversion recording, depending on configuration.
Can the same page appear in multiple paths?
Yes. A page can serve different purposes in different paths with separate tracking configurations.
Can inactive paths be reactivated?
Yes. Edit the path, change status to Active, and adjust the date range if needed. Configuration is preserved.
Zones
Does the zone track if the page layout changes?
Zones use percentage-based positioning, adapting to minor changes. Significant redesigns may require reconfiguration. Manual CSS selectors provide the most resilience.
Can one step have multiple zones?
Each step links to one zone. To track multiple elements on a page, create multiple steps pointing to the same page, each with its own zone.
What if the CSS selector matches multiple elements?
The zone tracks interactions with any matching element. Use more specific selectors to target only the intended element.
Do I need to configure all three device types?
Configure devices your visitors use. Desktop is typically essential. Add mobile if traffic warrants. Unconfigured devices will not track.
How do I know if tracking is working?
Active paths with configured zones record conversions that appear in reporting dashboards. Allow time for data collection.
Getting help
Contact support for persistent tracking or preview issues